この記事は
Windows Phone / Windows 10 Mobile Advent Calendar 2015
8日目の記事です。
ブログ不精のいっちゅうです。
この記事は以下環境で説明されています。
OS:Windows10
IDE:VisualStudio2015
必須:Windows10SDK(2015/11/30)
はじめに・・・・
「タブコントロールが使いたい!」
本当はUWP的にはPivotがPCとモバイル共通で使えるようになったので
それを使うのがいいんだろうけど、アイコンだけなどならやはり
従来のタブっぽいの方がUI的に良いこともあります。
良いのが無いかググってみる。
タブとピボットのガイドライン

お!ガイドラインのサンプルに良さげのタブコントロールっぽいのあるじゃん。
さらに探す→ない!
もちろんVSのコントロールにもない!
ガイドラインに紹介するぐらいならサンプルぐらい用意しとけよ!
って思いましたが
仕方がないので、自分で作るかーってなりました。
そもそもタブコントロールって1つのタブが選択されたら他が解除される。
これってラジオボタンと同じですよね。
ラジオボタンのスタイルを変えてやれば良さそうです。
XAMLのページリソースにstyleを設定してやります。
	<Page.Resources>
		<SolidColorBrush x:Key="NavButtonPressedBackgroundBrush" Color="White" Opacity="0" />
		<SolidColorBrush x:Key="NavButtonCheckedBackgroundBrush" Color="#FF666666" Opacity="1" />
		<SolidColorBrush x:Key="NavButtonHoverBackgroundBrush" Color="White" Opacity="0" />

		<Style x:Key="NavRadioButtonStyle" TargetType="RadioButton">
			<Setter Property="Background" Value="Transparent"/>
			<Setter Property="Padding" Value="0"/>
			<Setter Property="HorizontalAlignment" Value="Stretch"/>
			<Setter Property="VerticalAlignment" Value="Center"/>
			<Setter Property="HorizontalContentAlignment" Value="Left"/>
			<Setter Property="VerticalContentAlignment" Value="Center"/>
			<Setter Property="Template">
				<Setter.Value>
					<ControlTemplate TargetType="RadioButton">
						<Border BorderBrush="{TemplateBinding BorderBrush}" BorderThickness="{TemplateBinding BorderThickness}" Background="{TemplateBinding Background}">
							<VisualStateManager.VisualStateGroups>
								<VisualStateGroup x:Name="CommonStates">
									<VisualState x:Name="Normal"/>
									<VisualState x:Name="Disabled" />
								</VisualStateGroup>
								<VisualStateGroup x:Name="CheckStates">
									<VisualState x:Name="Checked">
										<Storyboard>
											<ObjectAnimationUsingKeyFrames Storyboard.TargetProperty="Background" Storyboard.TargetName="BackgroundGrid">
												<DiscreteObjectKeyFrame KeyTime="0" Value="{StaticResource NavButtonCheckedBackgroundBrush}"/>
											</ObjectAnimationUsingKeyFrames>
										</Storyboard>
									</VisualState>
									<VisualState x:Name="Unchecked"/>
									<VisualState x:Name="Indeterminate"/>
								</VisualStateGroup>
								<VisualStateGroup x:Name="FocusStates">
									<VisualState x:Name="Focused"/>
									<VisualState x:Name="Unfocused"/>
									<VisualState x:Name="PointerFocused"/>
								</VisualStateGroup>
							</VisualStateManager.VisualStateGroups>
							<Grid Name="BackgroundGrid" Background="Transparent" VerticalAlignment="Stretch"  MinWidth="20"  HorizontalAlignment="Stretch" >
								<Grid.RowDefinitions>
									<RowDefinition Height="32"/>
									<RowDefinition Height="*"/>
								</Grid.RowDefinitions>
								<Image Width="30" VerticalAlignment="Bottom" MinHeight="30" Height="30" Source="{Binding RelativeSource={RelativeSource TemplatedParent}, Path=Tag}" Margin="0"/>
								<ContentPresenter x:Name="ContentPresenter" AutomationProperties.AccessibilityView="Raw" ContentTemplate="{TemplateBinding ContentTemplate}" ContentTransitions="{TemplateBinding ContentTransitions}" Content="{TemplateBinding Content}" Grid.Row="1" HorizontalAlignment="{TemplateBinding HorizontalContentAlignment}" Margin="{TemplateBinding Padding}" TextWrapping="Wrap" VerticalAlignment="{TemplateBinding VerticalContentAlignment}"/>
							</Grid>
						</Border>
					</ControlTemplate>
				</Setter.Value>
			</Setter>
		</Style>
	</Page.Resources>
ラジオボタンの押せる部分をGrid全体にして、クリックするとvisualstateで背景色を変えるようにします。
またTagに画像のパスを入力すると画像が表示されるようにしています。
あとは以下のようなXAMLを書けばOKです。
	<grid Background="{ThemeResource ApplicationPageBackgroundThemeBrush}">
		<Grid.RowDefinitions>
			<RowDefinition Height="50"/>
			<RowDefinition Height="*"/>
		</Grid.RowDefinitions>
		<grid Grid.Row="0" Background="#FF333333">
			<Grid.ColumnDefinitions>
				<ColumnDefinition/>
				<ColumnDefinition/>
				<ColumnDefinition/>
				<ColumnDefinition/>
			</Grid.ColumnDefinitions>
			<radiobutton x:Name="Tab1" Grid.Column="0" MinWidth="20" HorizontalContentAlignment="Center" Content="Tab1" Tag="/Assets/Square44x44Logo.scale-200.png" Style="{StaticResource NavRadioButtonStyle}" IsChecked="True" Foreground="White"></radiobutton>
			<radiobutton x:Name="Tab2" Grid.Column="1" MinWidth="20" HorizontalContentAlignment="Center" Content="Tab2" Tag="/Assets/Square44x44Logo.scale-200.png"  Style="{StaticResource NavRadioButtonStyle}" IsChecked="False" Foreground="White"></radiobutton>
			<radiobutton x:Name="Tab3" Grid.Column="2" MinWidth="20" HorizontalContentAlignment="Center" Content="Tab3" Tag="/Assets/Square44x44Logo.scale-200.png"  Style="{StaticResource NavRadioButtonStyle}" IsChecked="False" Foreground="White"></radiobutton>
			<radiobutton x:Name="Tab4" Grid.Column="3" MinWidth="20" HorizontalContentAlignment="Center" Content="Tab4" Tag="/Assets/Square44x44Logo.scale-200.png"  Style="{StaticResource NavRadioButtonStyle}" IsChecked="False" Foreground="White"></radiobutton>

		<grid Grid.Row="1">
			<!--ここにコンテンツ-->
		</grid>
	</Grid>
結果はこちら。
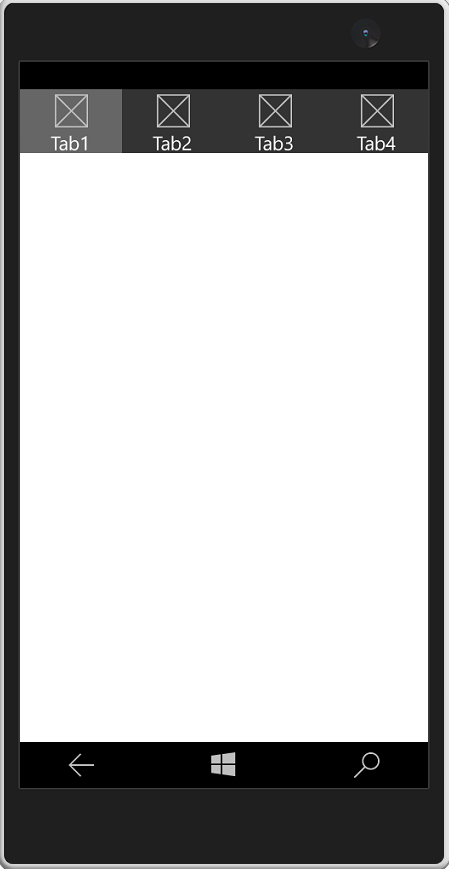

あとはラジオボタンと同じなのでCheckedイベントを取ってページを変えるなり良い感じに処理すればよいです。
サンプルプロジェクトはこちら
次の日は@robo_robo123さんです。